오늘 보고 넘어갈것들
- Xcode 프로그램 적응
- 앱 만들면서 기능 복습하기
0. 앱스토어에 존재하는 무드등 앱들

1-1. Xcode 관련기능
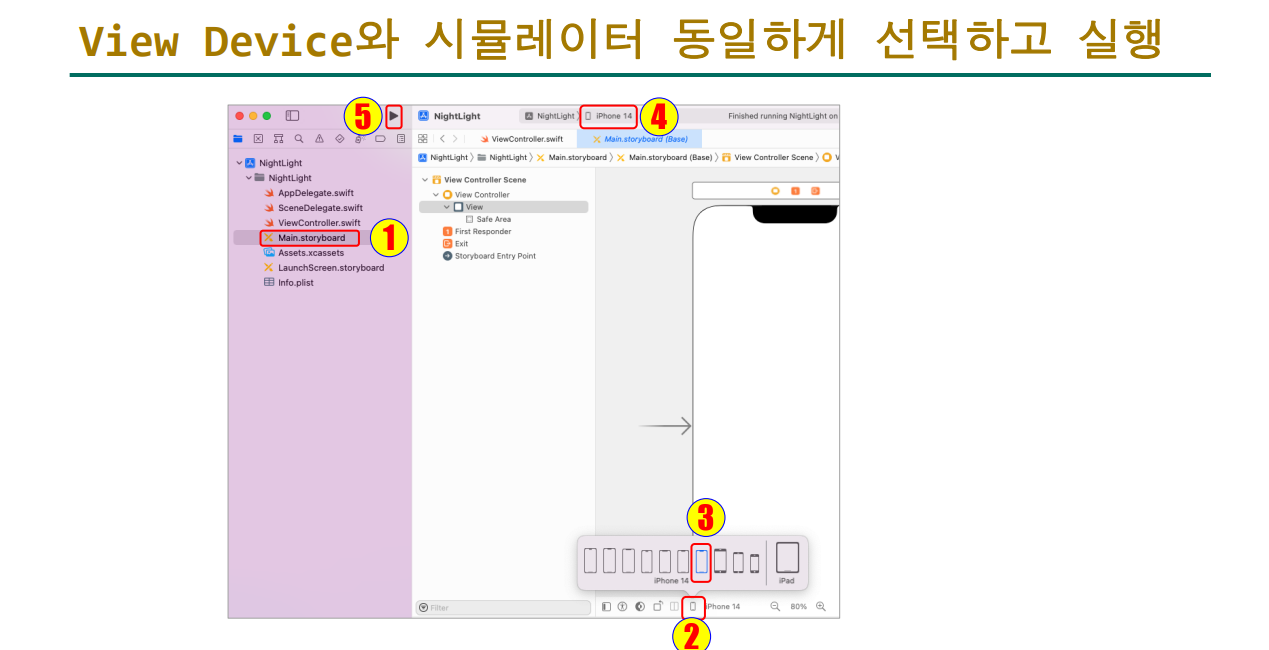
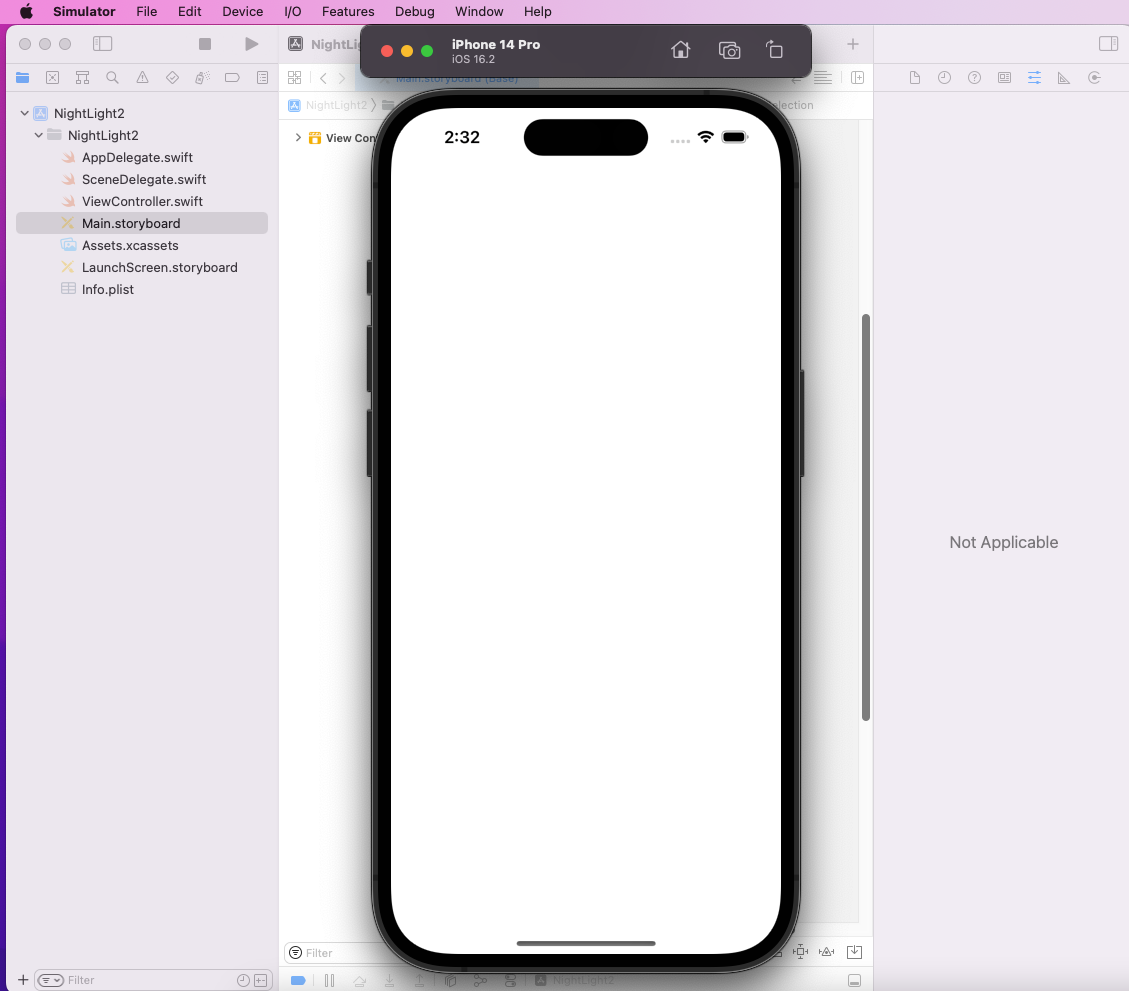
1-2. 애뮬레이터 실행 , 실행 화면
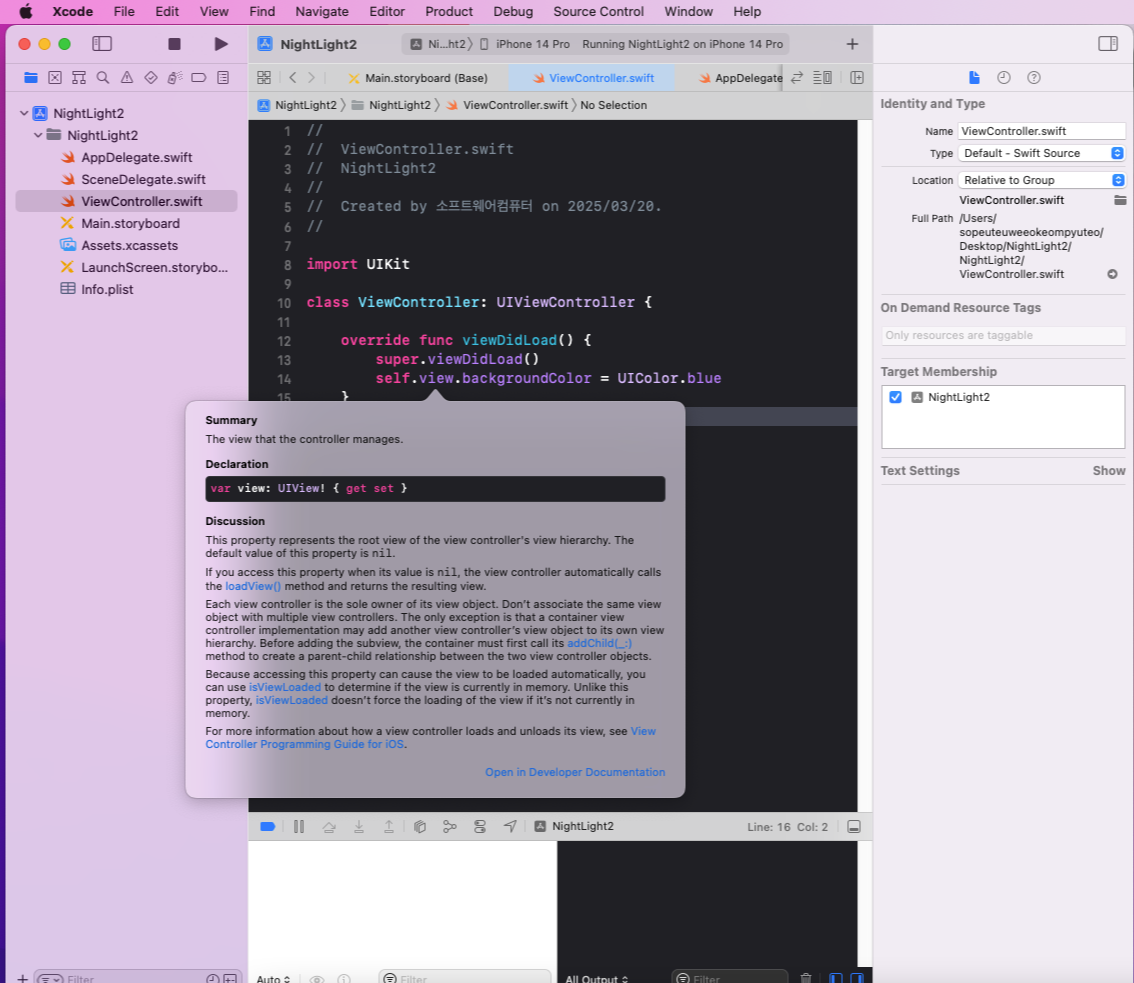
1-3. 코드에 대한 도움말 (Alt + 코드에 커서 대기)
2. 메서드 관련
2-1. scene 기반 App Life Cycle
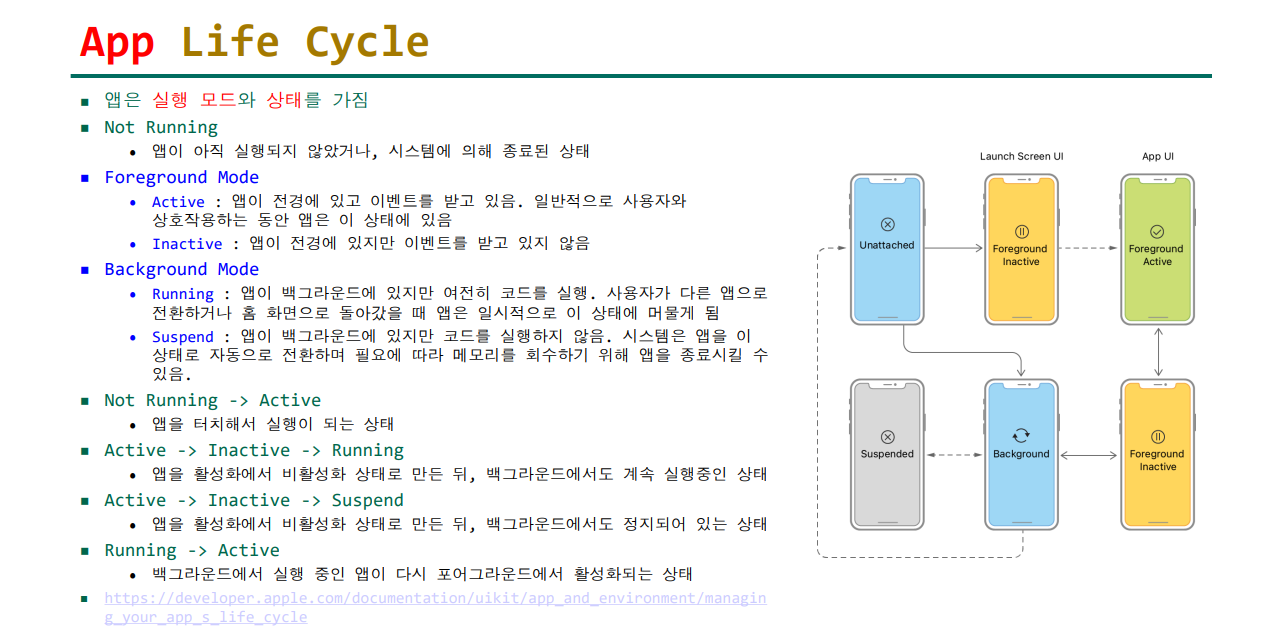
2-2. App Life Cycle
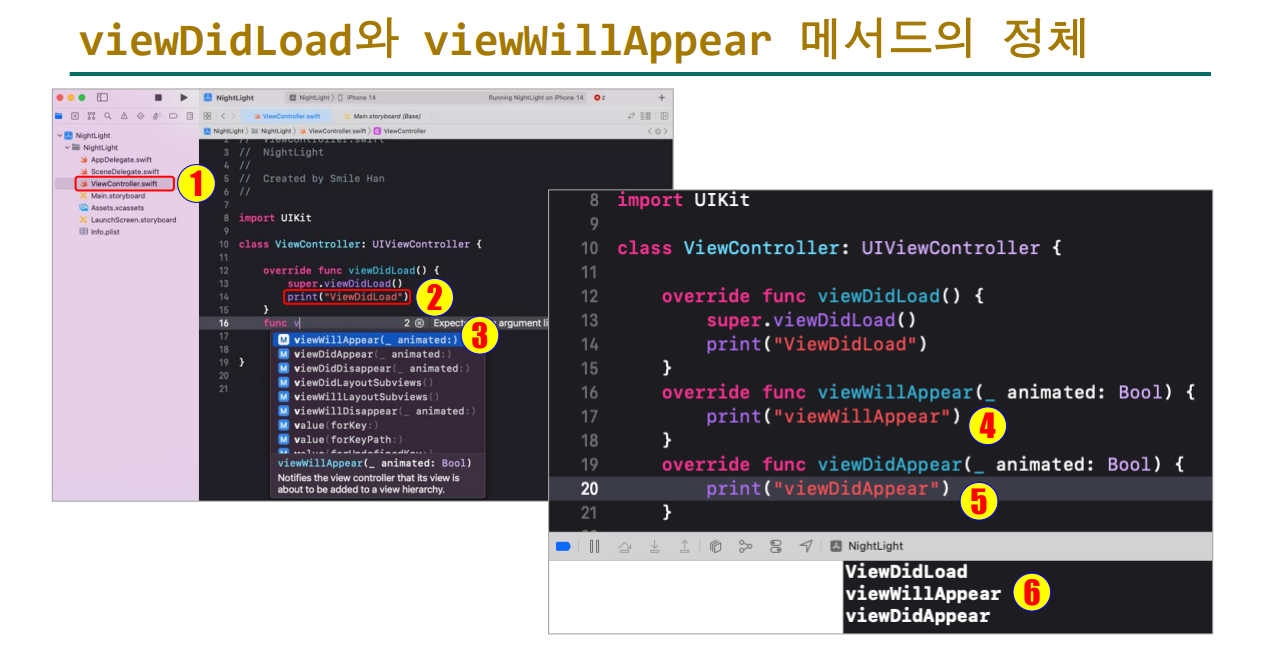
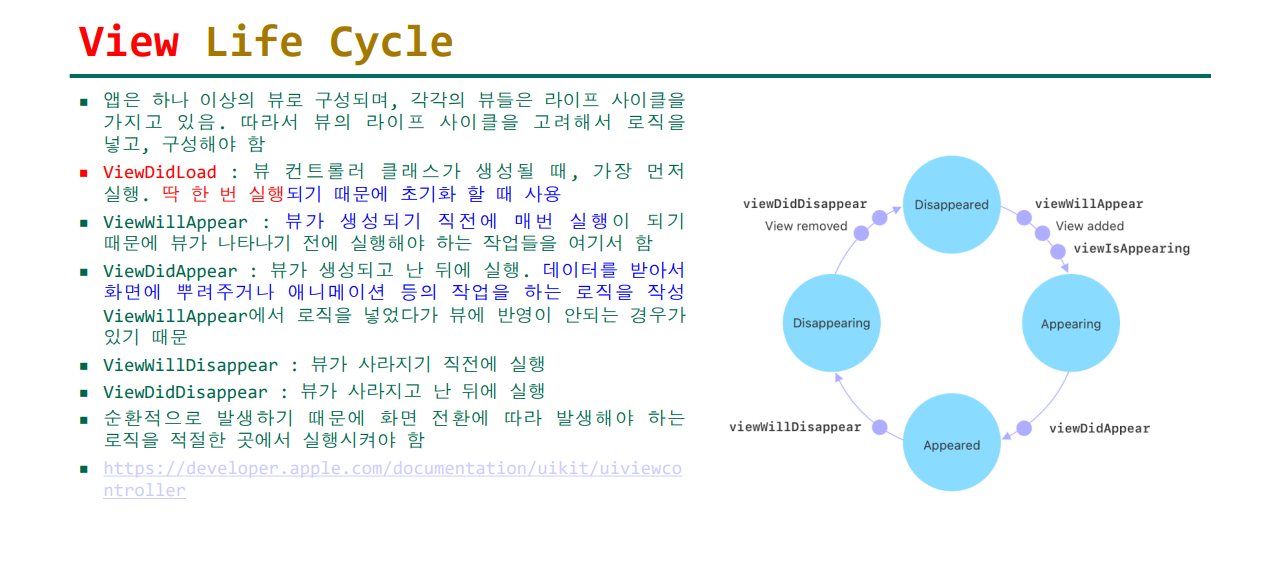
2-3. View Life Cycle
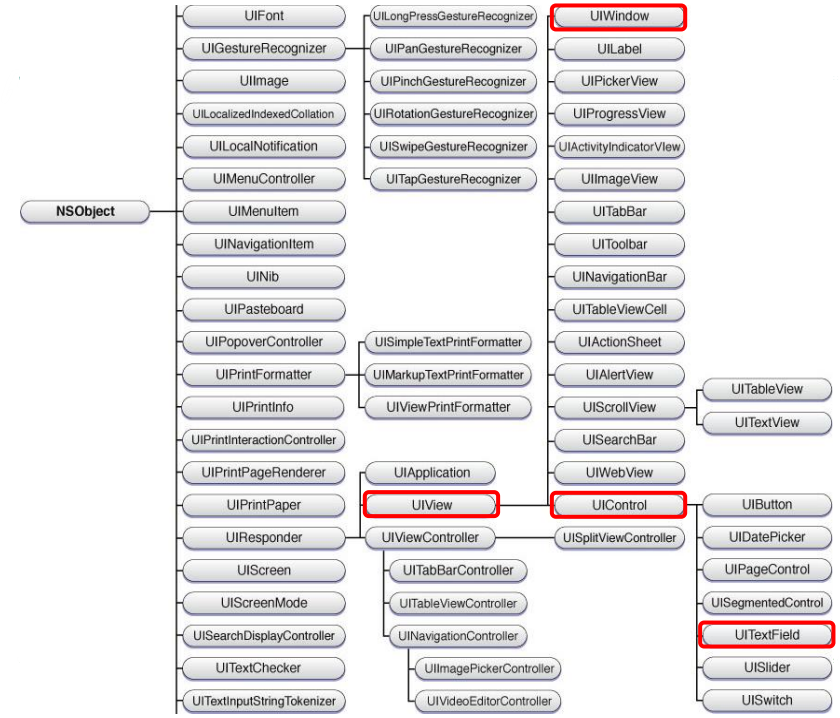
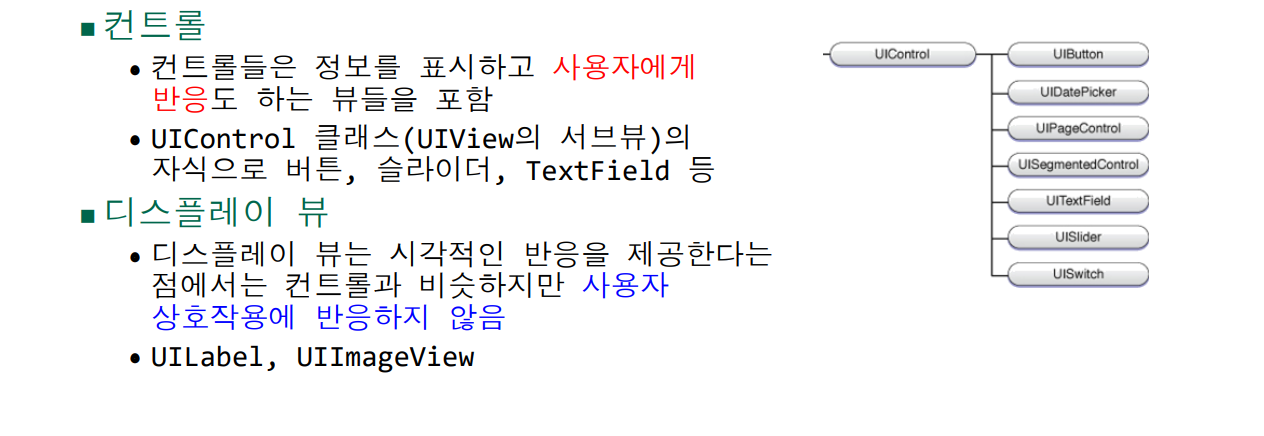
2-4. View
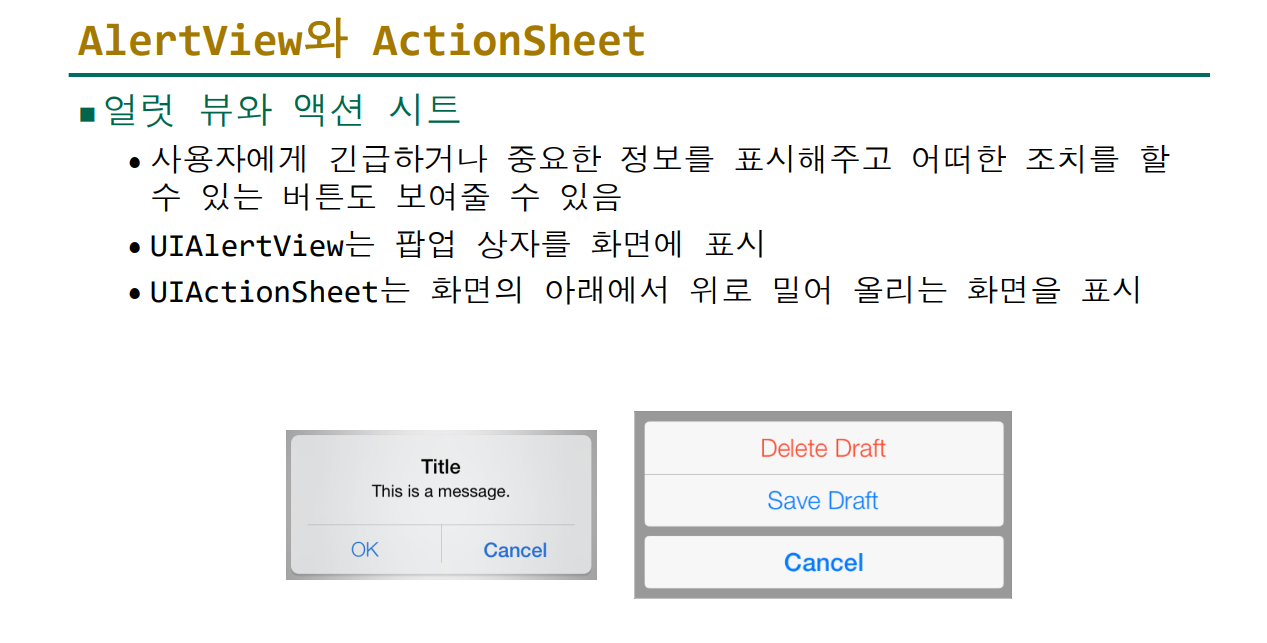
2-5. AlertView , Actionsheet
3. 무드등 앱 만들기
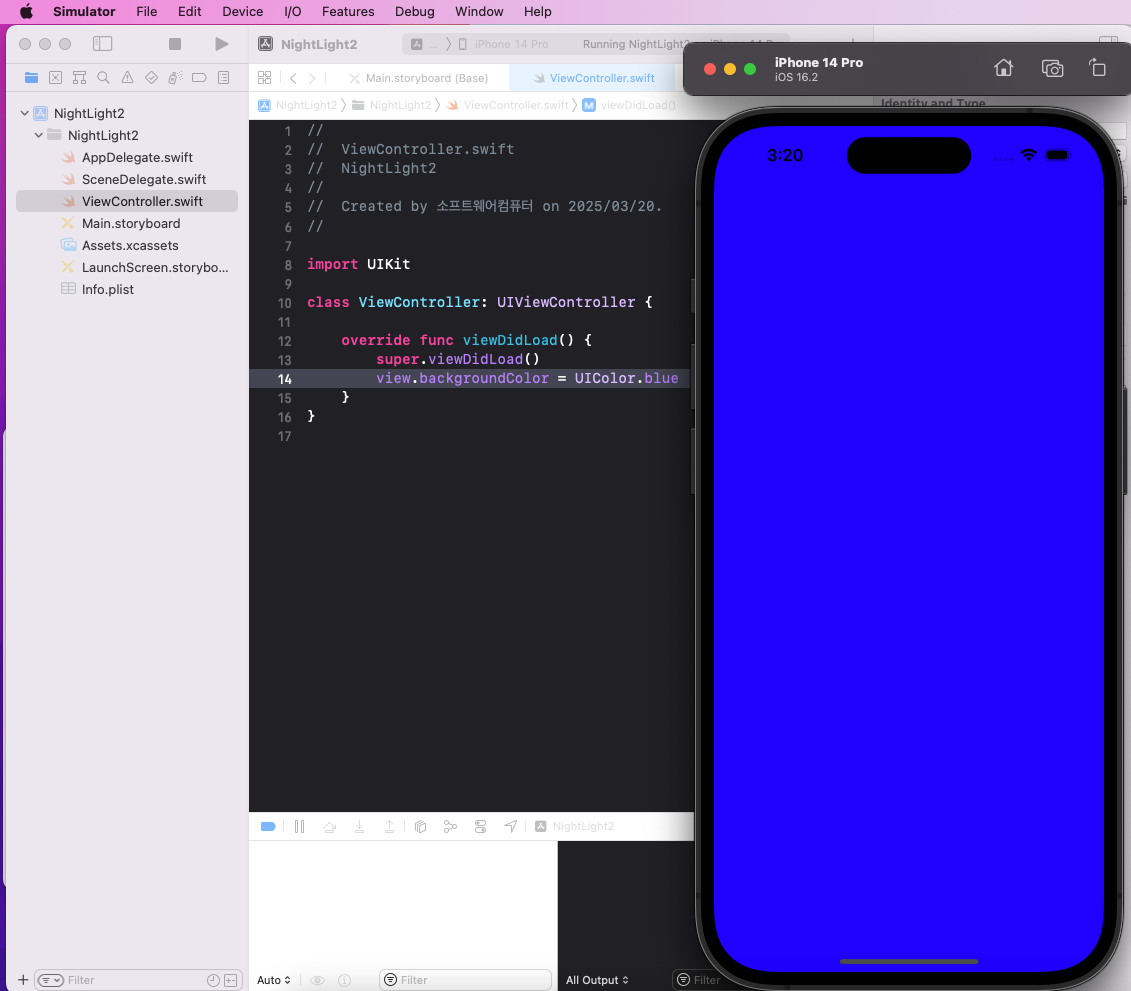
3-1. 배경색 지정하기
빠른 진행을 위해 코드만 올려져 있습니다.
import UIKit

class ViewController: UIViewController {
	override func viewDidLoad() {
    	super.viewDidLoad()
    	view.backgroundColor = UIcolor.blue
    }
}
3-2. 배경색을 무작위로 나오게 하기
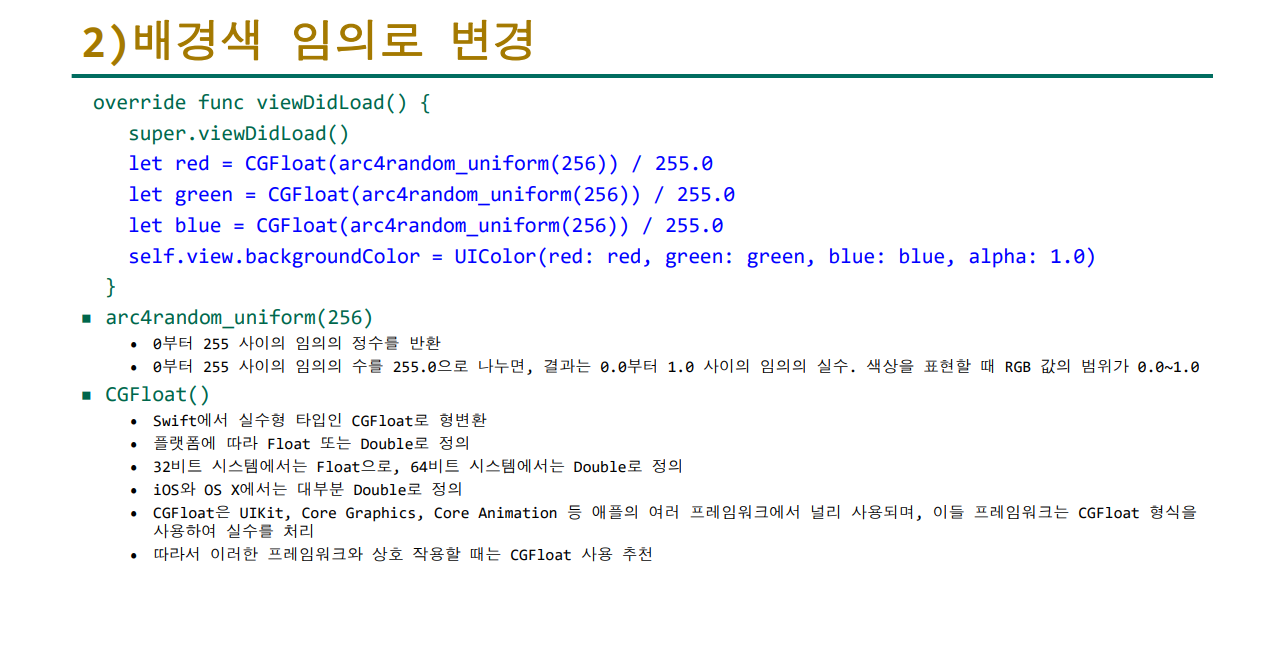
import UIKit

class ViewController: UIViewController {

   override func viewDidLoad() {
    super.viewDidLoad()
    let red = CGFloat(arc4random_uniform(256)) / 255.0
    let green = CGFloat(arc4random_uniform(256)) / 255.0
    let blue = CGFloat(arc4random_uniform(256)) / 255.0
    self.view.backgroundColor = UIColor(red: red, green: green, blue: blue, alpha: 1.0)
  }
  }
3-3. 1초마다 배경을 바꾸게 만들기
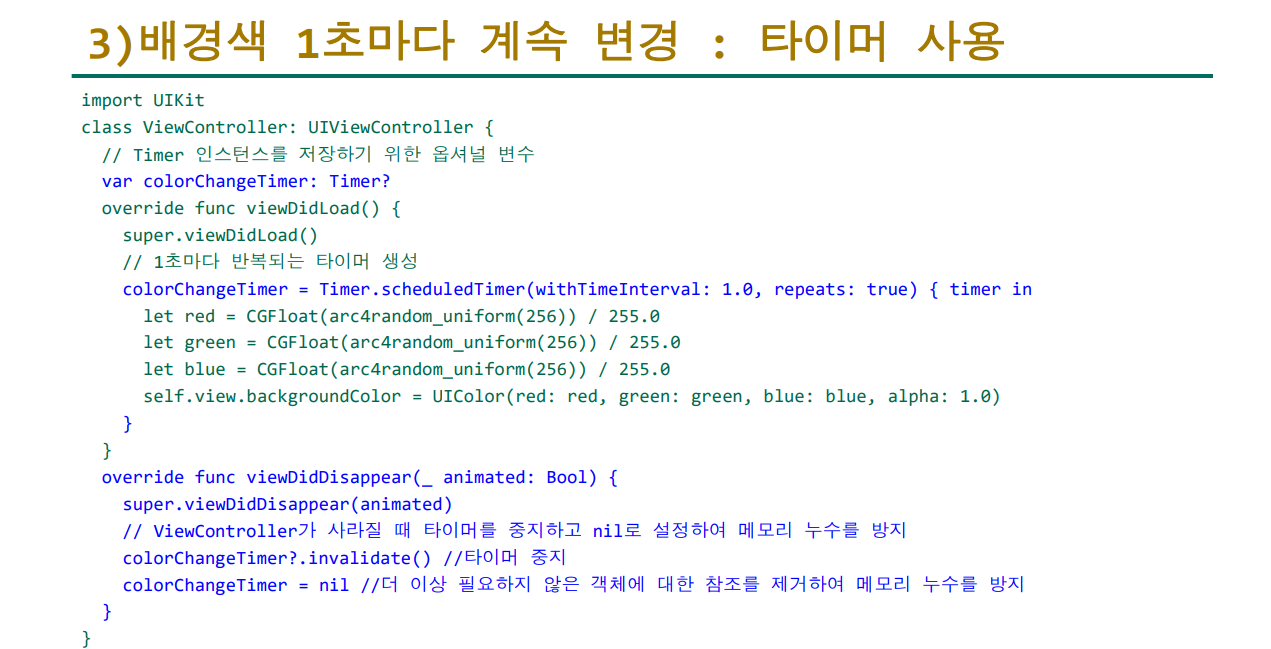
import UIKit

class ViewController: UIViewController {
  var colorChangeTimer: Timer?

  override func viewDidLoad() {
    super.viewDidLoad()

    colorChangeTimer = Timer.scheduledTimer(withTimeInterval: 1.0, repeats: true) { timer in
      let red = CGFloat(arc4random_uniform(256)) / 255.0
      let green = CGFloat(arc4random_uniform(256)) / 255.0
      let blue = CGFloat(arc4random_uniform(256)) / 255.0
      self.view.backgroundColor = UIColor(red: red, green: green, blue: blue, alpha: 1.0)
    }
  }
  override func viewDidDisappear(_ animated: Bool) {
    super.viewDidDisappear(animated)
    colorChangeTimer?.invalidate()
    colorChangeTimer = nil
  }
}
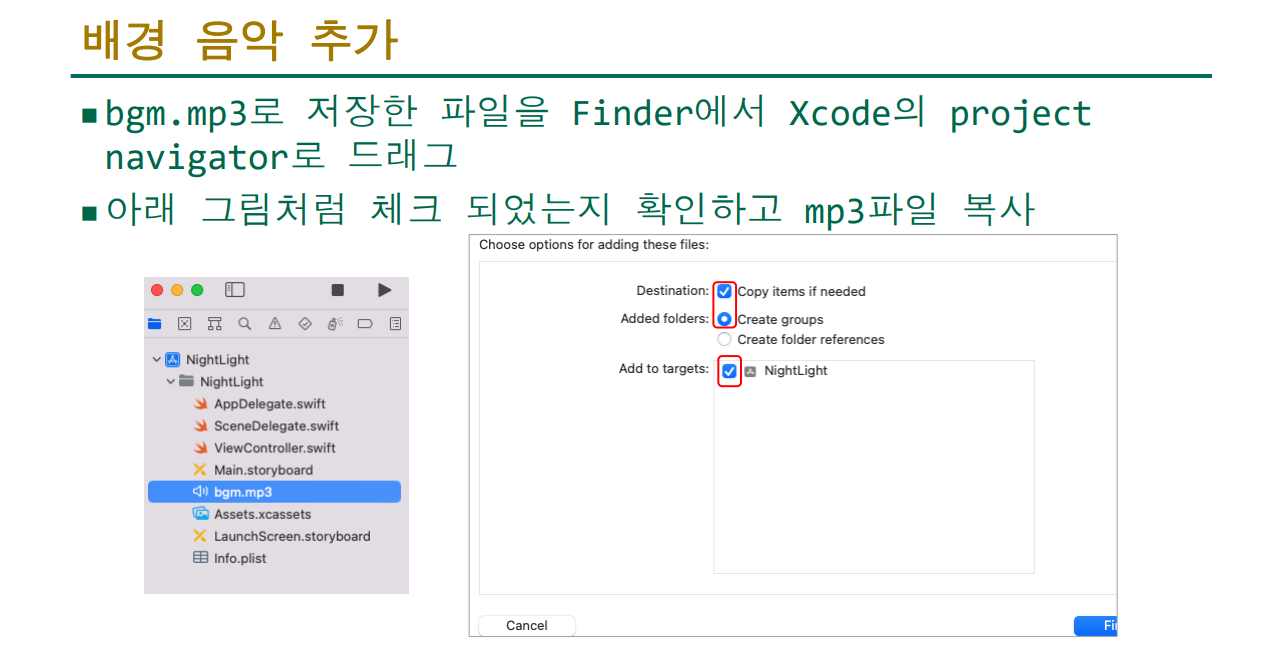
3-4. 배경 음악 추가하기
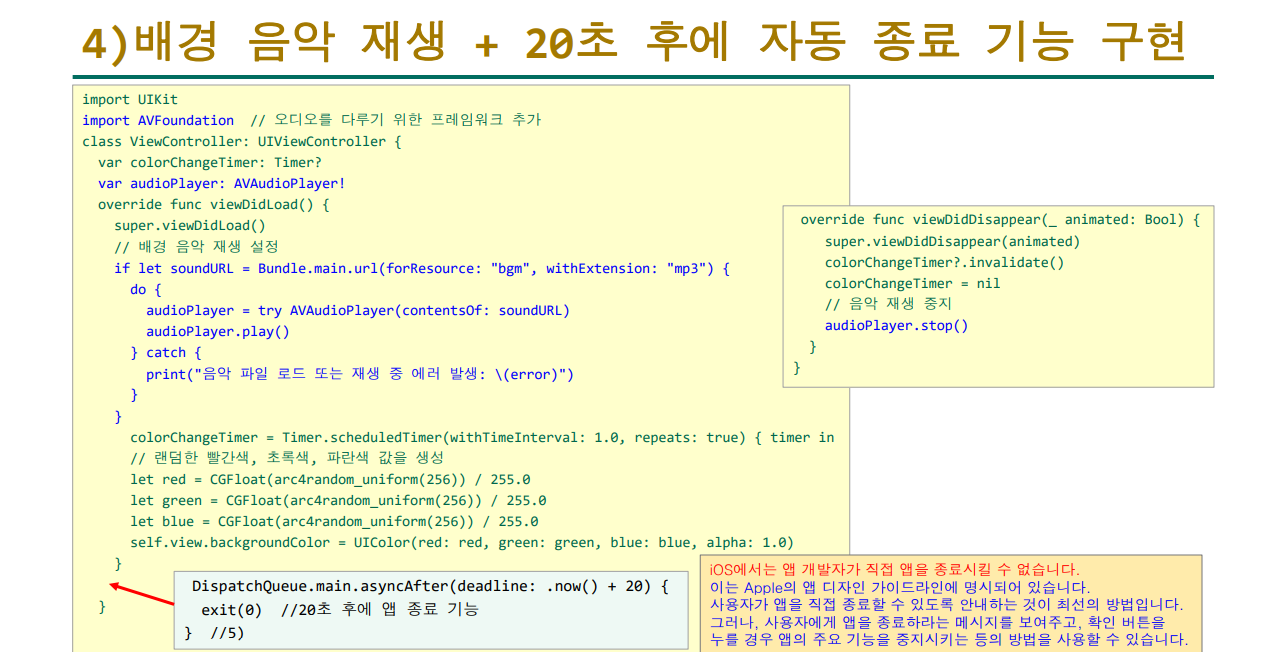
import UIKit
import AVFoundation

class ViewController: UIViewController {

  var colorChangeTimer: Timer?
  var audioPlayer: AVAudioPlayer!

  override func viewDidLoad() {
    super.viewDidLoad()

    if let soundURL = Bundle.main.url(forResource: "bgm", withExtension: "mp3") {
      do {
        audioPlayer = try AVAudioPlayer(contentsOf: soundURL)
        audioPlayer.play()
      } catch {
        print("음악 파일 로드 또는 재생 중 에러 발생: \(error)")
      }
    }

    colorChangeTimer = Timer.scheduledTimer(withTimeInterval: 1.0, repeats: true) { timer in
      let red = CGFloat(arc4random_uniform(256)) / 255.0
      let green = CGFloat(arc4random_uniform(256)) / 255.0
      let blue = CGFloat(arc4random_uniform(256)) / 255.0
      self.view.backgroundColor = UIColor(red: red, green: green, blue: blue, alpha: 1.0)
    }
  }

  override func viewDidDisappear(_ animated: Bool) {
    super.viewDidDisappear(animated)

    colorChangeTimer?.invalidate()
    colorChangeTimer = nil

    audioPlayer.stop()
  }
}
3-5. 버튼을 누르면 재시작 알림 띄우기
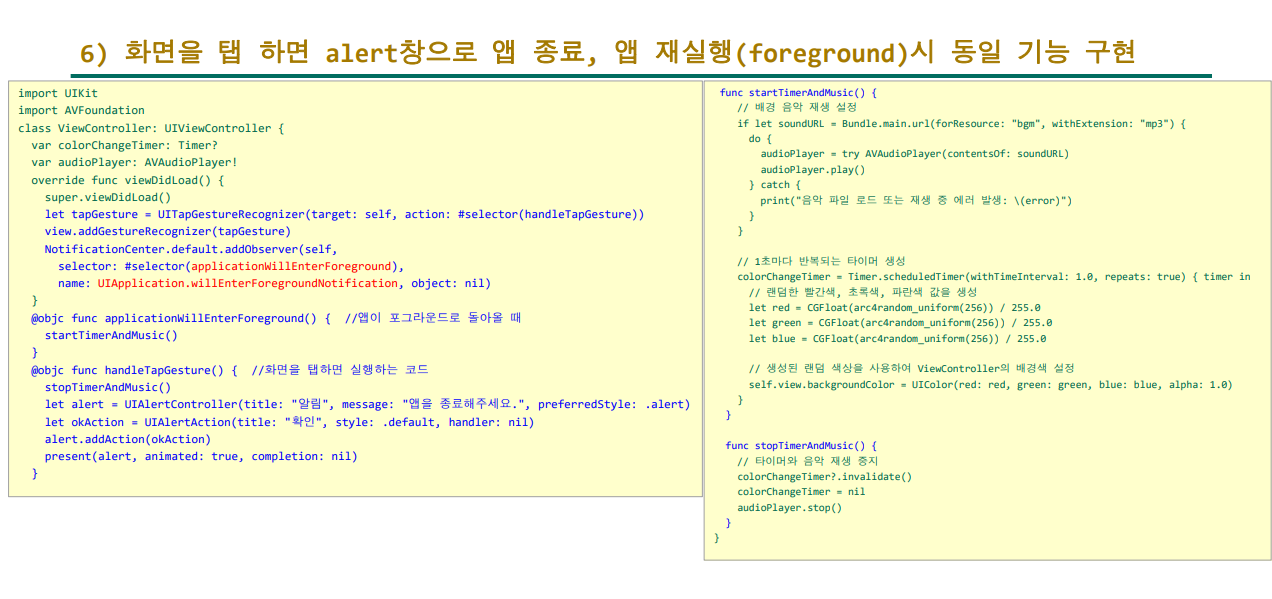
import UIKit
import AVFoundation

class ViewController: UIViewController {

  var colorChangeTimer: Timer?
  var audioPlayer: AVAudioPlayer!

  override func viewDidLoad() {
    super.viewDidLoad()

    let tapGesture = UITapGestureRecognizer(target: self, action: #selector(handleTapGesture))
    view.addGestureRecognizer(tapGesture)

    NotificationCenter.default.addObserver(self, selector: #selector(applicationWillEnterForeground), name: UIApplication.willEnterForegroundNotification, object: nil)
  }

  @objc func applicationWillEnterForeground() {
    startTimerAndMusic()
  }

  @objc func handleTapGesture() {
    stopTimerAndMusic()

    let alert = UIAlertController(title: "알림", message: "앱을 종료해주세요.", preferredStyle: .alert)
    let okAction = UIAlertAction(title: "확인", style: .default, handler: nil)
    alert.addAction(okAction)
    present(alert, animated: true, completion: nil)
  }

  func startTimerAndMusic() {
    // 배경 음악 재생 설정
    if let soundURL = Bundle.main.url(forResource: "bgm", withExtension: "mp3") {
      do {
        audioPlayer = try AVAudioPlayer(contentsOf: soundURL)
        audioPlayer.play()
      } catch {
        print("음악 파일 로드 또는 재생 중 에러 발생: \(error)")
      }
    }

    // 1초마다 반복되는 타이머 생성
    colorChangeTimer = Timer.scheduledTimer(withTimeInterval: 1.0, repeats: true) { timer in
      // 랜덤한 빨간색, 초록색, 파란색 값을 생성
      let red = CGFloat(arc4random_uniform(256)) / 255.0
      let green = CGFloat(arc4random_uniform(256)) / 255.0
      let blue = CGFloat(arc4random_uniform(256)) / 255.0

      // 생성된 랜덤 색상을 사용하여 ViewController의 배경색 설정
      self.view.backgroundColor = UIColor(red: red, green: green, blue: blue, alpha: 1.0)
    }
  }

  func stopTimerAndMusic() {
    // 타이머와 음악 재생 중지
    colorChangeTimer?.invalidate()
    colorChangeTimer = nil
    audioPlayer.stop()
  }
}
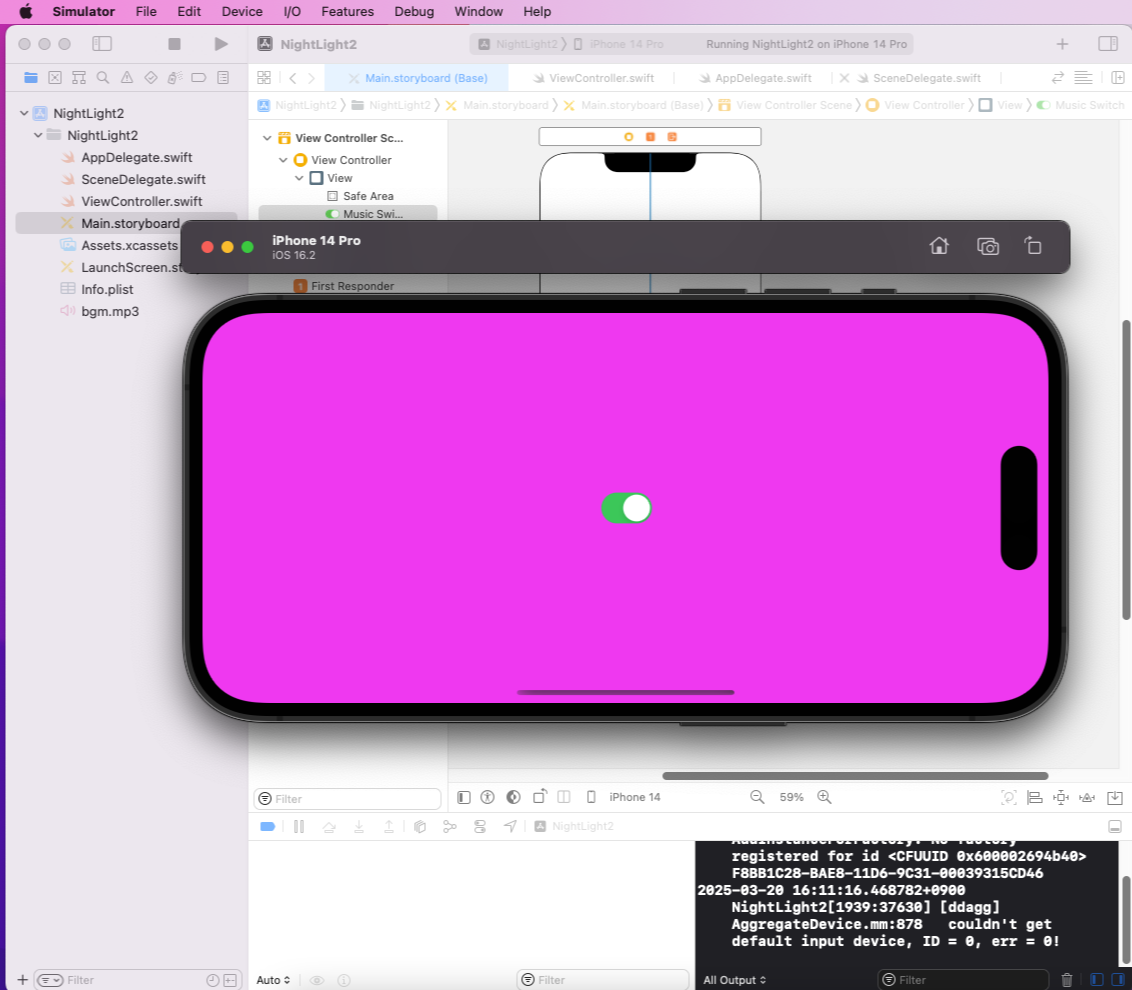
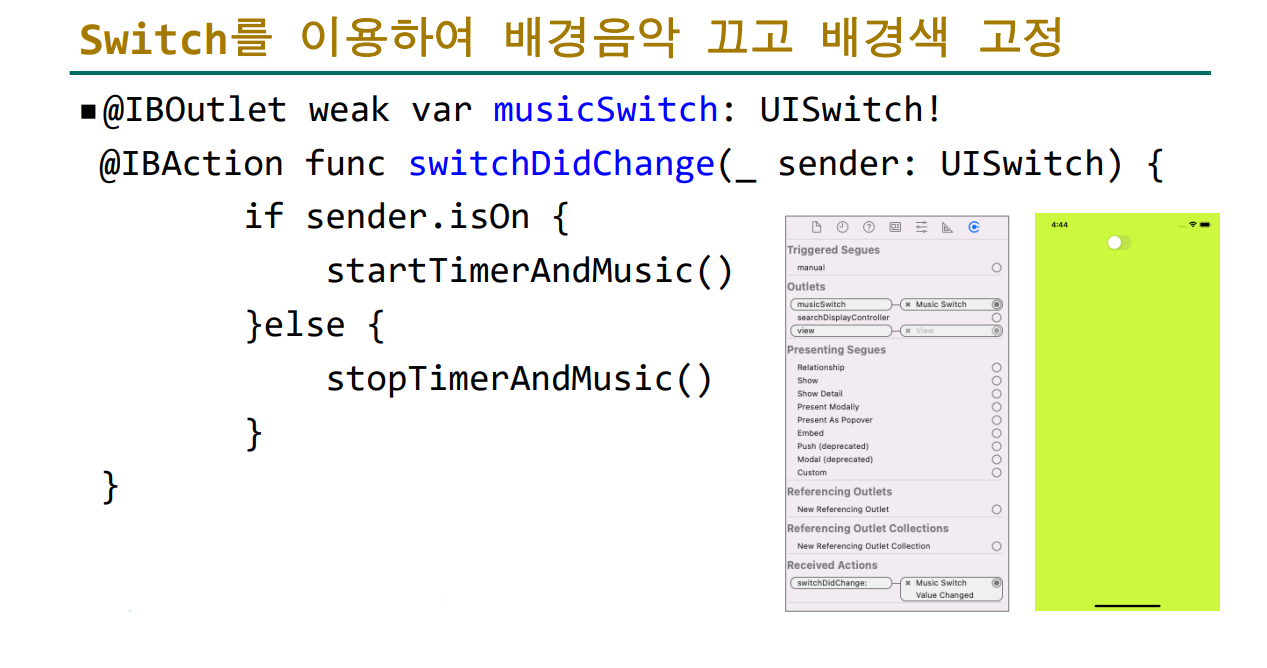
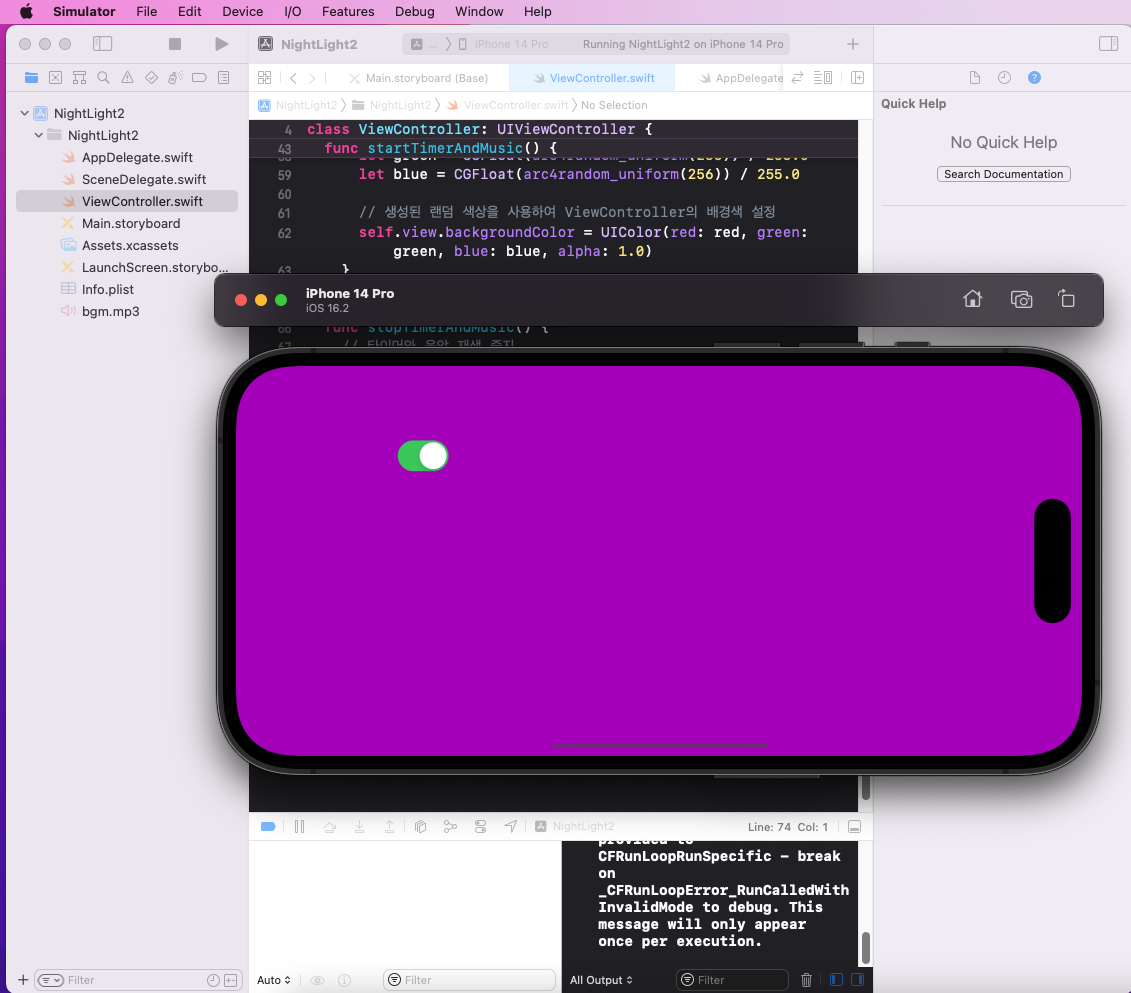
3-6. 스위치를 누르면 배경색이 고정되도록 설정
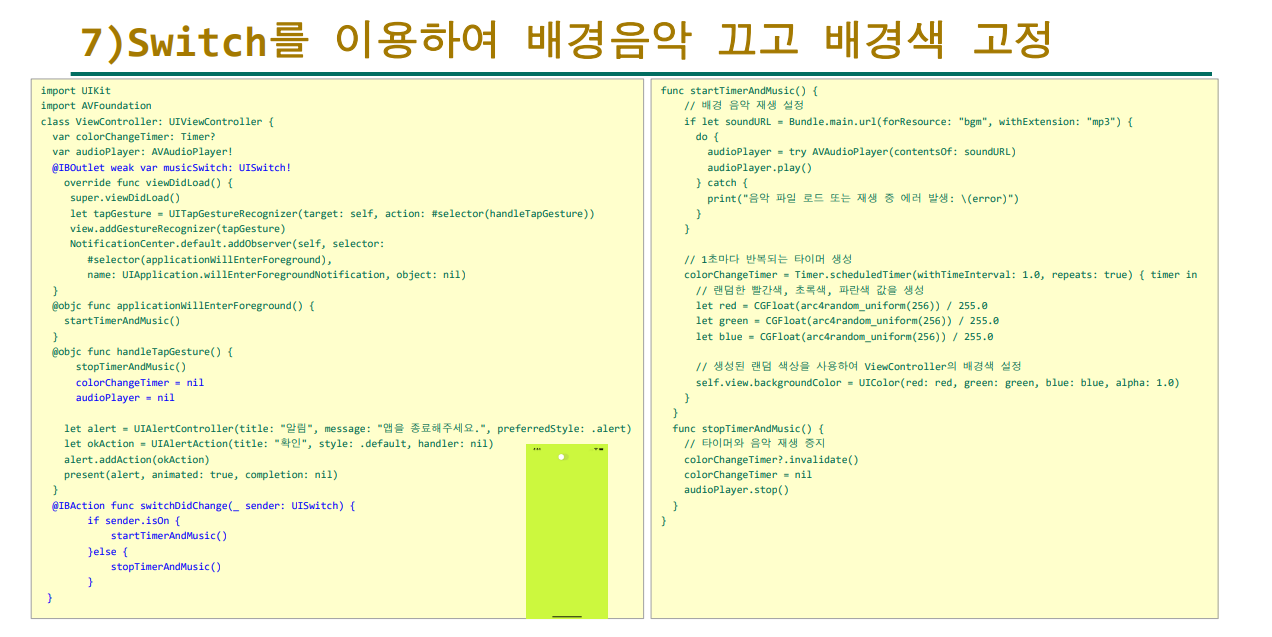
import UIKit
import AVFoundation

class ViewController: UIViewController {

  var colorChangeTimer: Timer?
  var audioPlayer: AVAudioPlayer!

    @IBOutlet weak var musicSwitch: UISwitch!

    override func viewDidLoad() {
    super.viewDidLoad()

    let tapGesture = UITapGestureRecognizer(target: self, action: #selector(handleTapGesture))
    view.addGestureRecognizer(tapGesture)

    NotificationCenter.default.addObserver(self, selector: #selector(applicationWillEnterForeground), name: UIApplication.willEnterForegroundNotification, object: nil)
  }

  @objc func applicationWillEnterForeground() {
    startTimerAndMusic()
  }

  @objc func handleTapGesture() {
    stopTimerAndMusic()
      colorChangeTimer = nil
      audioPlayer = nil

    let alert = UIAlertController(title: "알림", message: "앱을 종료해주세요.", preferredStyle: .alert)
    let okAction = UIAlertAction(title: "확인", style: .default, handler: nil)
    alert.addAction(okAction)
    present(alert, animated: true, completion: nil)
  }

    @IBAction func switchDidChange(_ sender: UISwitch) {
        if sender.isOn {
            startTimerAndMusic()
        }else {
            stopTimerAndMusic()
        }
    }
    func startTimerAndMusic() {
    // 배경 음악 재생 설정
    if let soundURL = Bundle.main.url(forResource: "bgm", withExtension: "mp3") {
      do {
        audioPlayer = try AVAudioPlayer(contentsOf: soundURL)
        audioPlayer.play()
      } catch {
        print("음악 파일 로드 또는 재생 중 에러 발생: \(error)")
      }
    }

    // 1초마다 반복되는 타이머 생성
    colorChangeTimer = Timer.scheduledTimer(withTimeInterval: 1.0, repeats: true) { timer in
      // 랜덤한 빨간색, 초록색, 파란색 값을 생성
      let red = CGFloat(arc4random_uniform(256)) / 255.0
      let green = CGFloat(arc4random_uniform(256)) / 255.0
      let blue = CGFloat(arc4random_uniform(256)) / 255.0

      // 생성된 랜덤 색상을 사용하여 ViewController의 배경색 설정
      self.view.backgroundColor = UIColor(red: red, green: green, blue: blue, alpha: 1.0)
    }
  }

  func stopTimerAndMusic() {
    // 타이머와 음악 재생 중지
    colorChangeTimer?.invalidate()
    colorChangeTimer = nil
    audioPlayer.stop()
  }
}
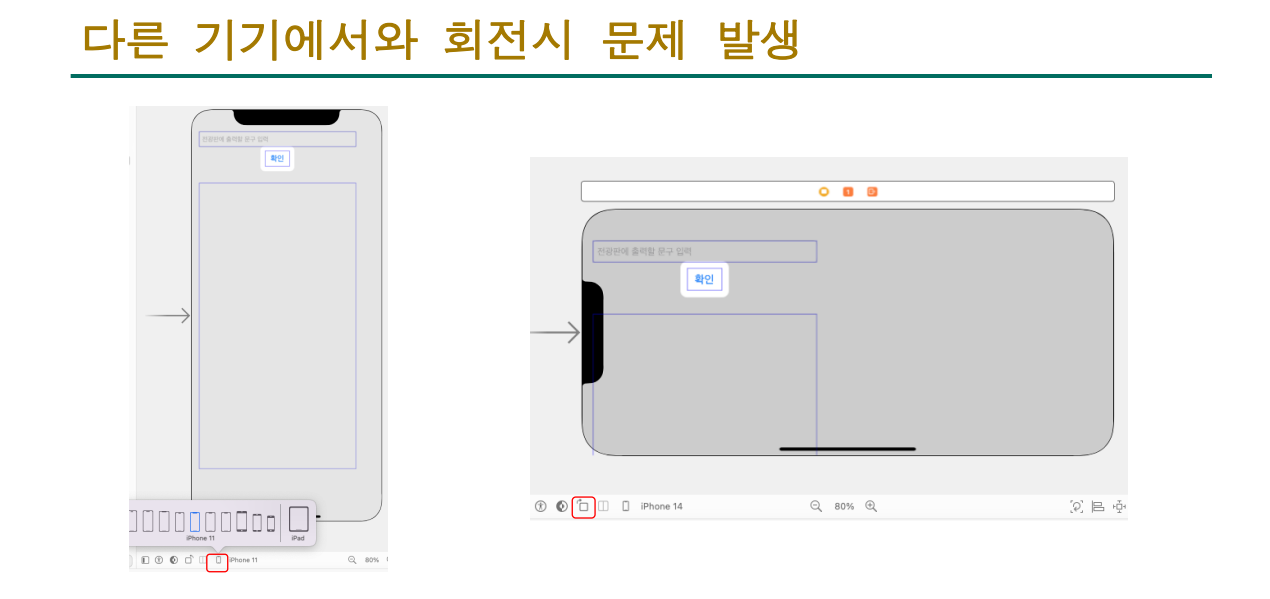
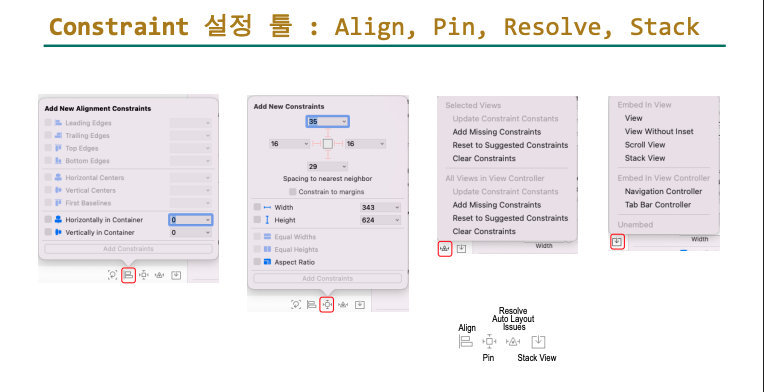
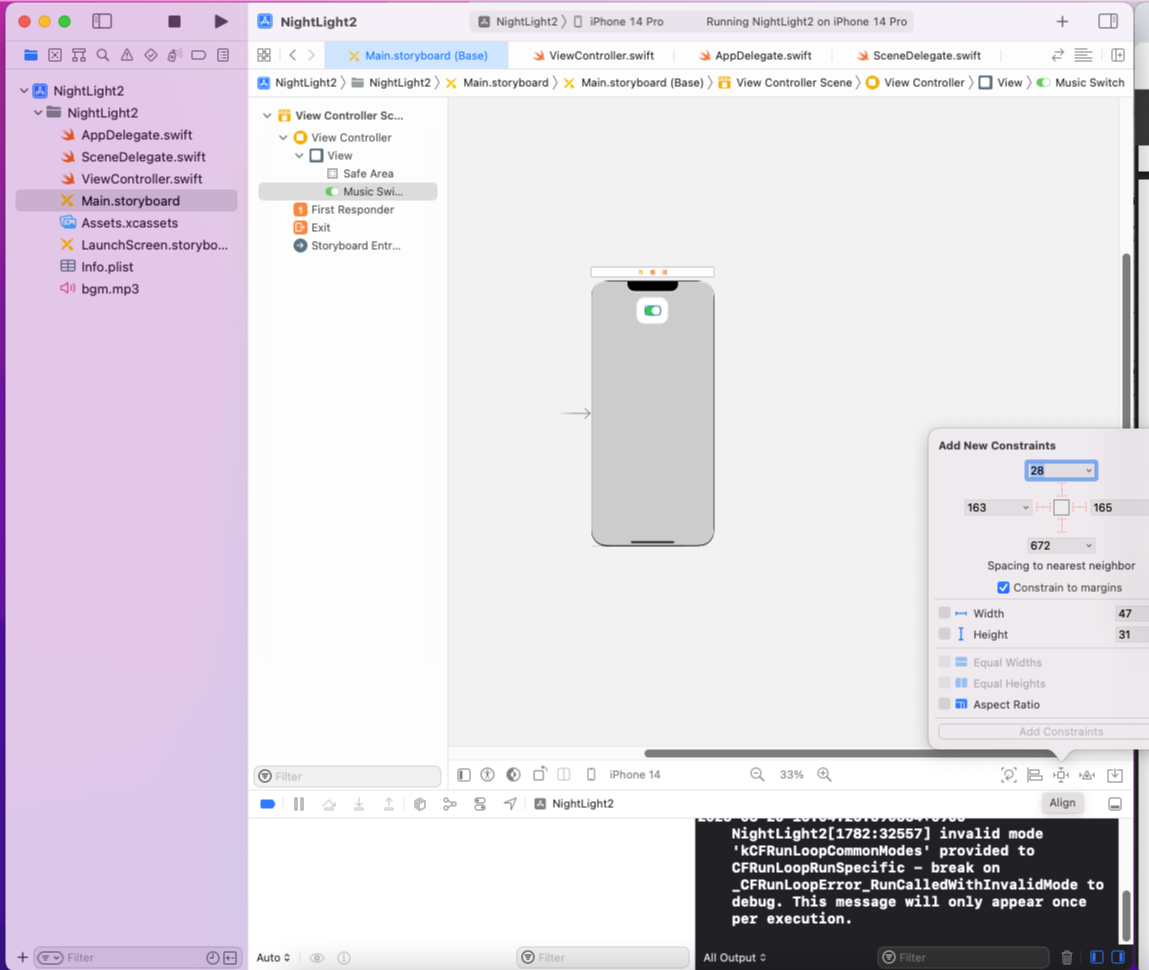
4. 추가적인 보조 설정 (제약조건)
코드를 짜서 앱을 만들었지만, 아직 끝나지 않은 문제가 있습니다.
화면을 돌리면 앱에 배치된 요소가 그대로 따라오지 않는 문제가 있죠.
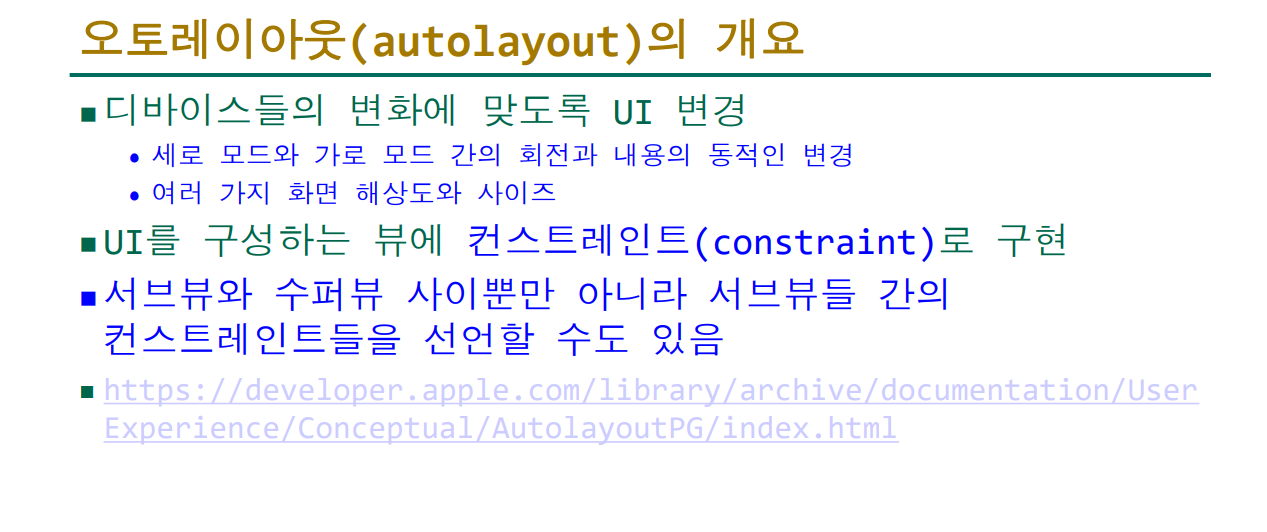
4-1. 오토레이아웃 개요
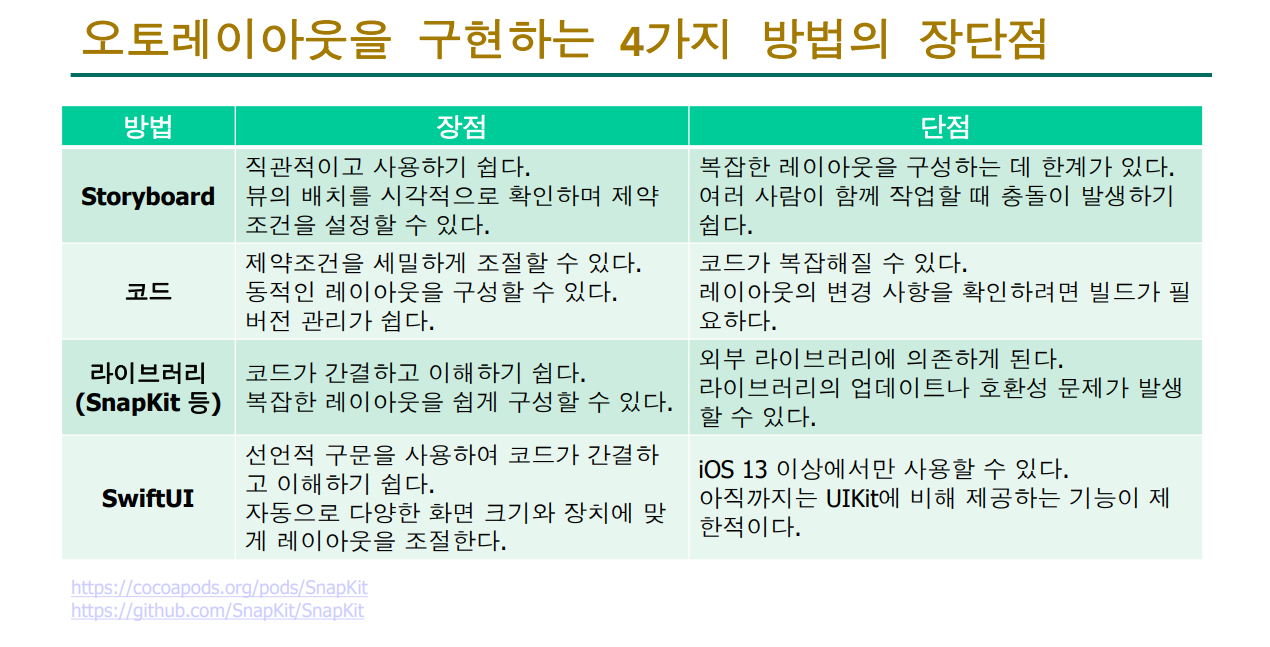
4-2. 오토레이아웃을 구현하는 방법들과 장단점
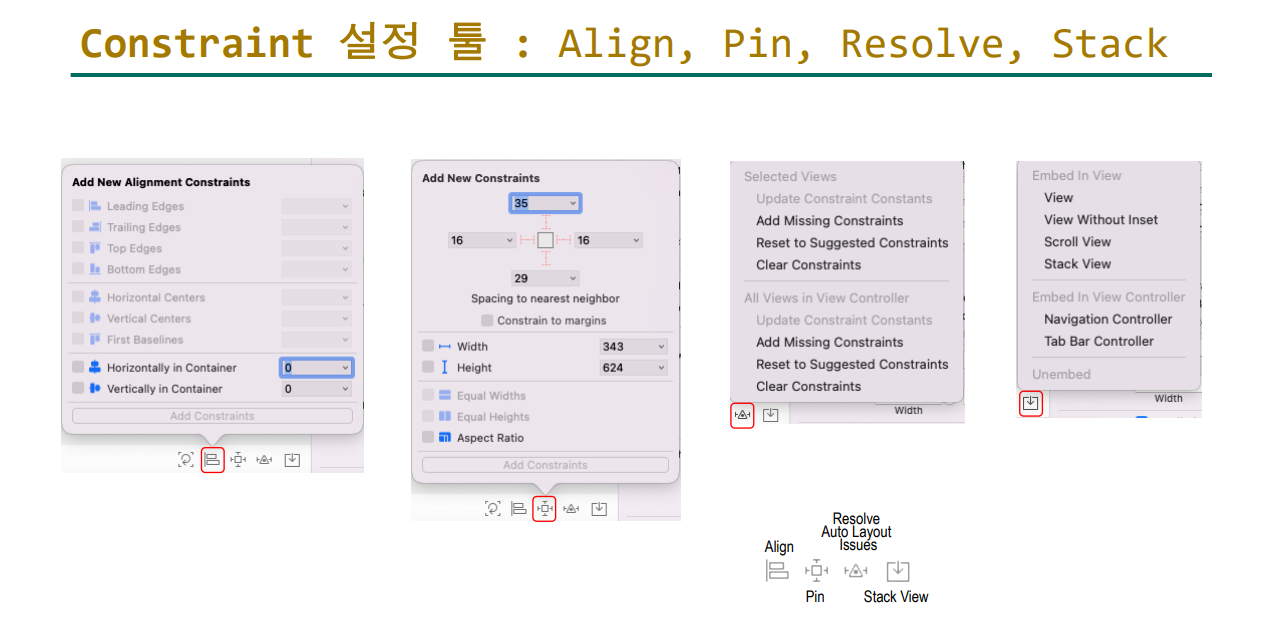
4-3. 제약조건 설정 툴
'실무 (iOS)' 카테고리의 다른 글
| iOS프로그래밍 실무 (6주차) [옵셔널 체이닝 , Error handling , generic , array] (0) | 2025.04.10 |
|---|---|
| iOS 프로그래밍실무 (5주차) [프로토콜,Xcode 앱만들기] (0) | 2025.04.06 |
| iOS프로그래밍 실무 (4주차) [함수,클래스,프로토콜] (0) | 2025.03.27 |
| iOS 프로그래밍 실무 (2주차) [자료형,Tuple,Optional,연산자,제어문, 그 외 기타] (0) | 2025.03.15 |
| iOS 프로그래밍 실무 [1주차] (0) | 2025.03.09 |


댓글